

Hello,
I don't have any kids, but I love arts & crafts! I wanted a cute but simple gift to give my Nana and my Mom from my sister's kids. Last year was cute, and wanted to follow up this year with something just as simple, but yet meaningful. ( last year is the picture below, with the 'NANA'. I printed these photos and put them in a floating picture frame, added cut out letters "I love" at the top and the "nana" pictures at the bottom)

Now on to this year's Mother's Day project:
I bought the supplies from Walmart and I spent less than $15
- Sponge brushes: $0.97
- Black acrylic paint : $ 1.77
- 8x10 canvas: $3.97 (2 came in the pack)
- letters (for their names): $0.97 each, (for both canvases I needed 2 for their names)
Supplies I already had & used (click picture to enlarge)
- hot glue gun & glue sticks
- 1.5 inch thick Ribbon (green bow canvas)
- 3/8th inch thick ribbon (blue bow canvas)
- scrap fabric (to create the bows)
- Mod podge
- 1 inch glaze/wash paintbrush


I didn't take a picture of the blank canvas nor did I take pictures while I was at my sister's house. My nephew is 1.5 and very active, I would not have been able to take photos and keep paint off of everything!
So first I put him in his high chair to keep him stationary and stable enough to stamp his hands on the canvas. I then put paint on the sponge brush and I then painted 1 of his hands. I put the canvas on his little tray on his high chair & I stamped his hand on the canvas, repainted his hand, and then stamped the second canvas, then wiped it off with a wet wash cloth. I then painted his other hand and repeated the process.
My other nephew is only 2.5 months old. He keeps his hands balled up all the time and I knew I would not be able to stamp his hands so I chose to stamp his feet instead. He was strapped in his mamaroo so we painted 1 foot and pressed his foot against the canvas, pushing the canvas on his foot through the back of the canvas to get a good enough impression. We (my sister helped me) stamped it on both canvases, then wiped it off and then painted the other foot and wiped it off after stamping it.

At this point I took the canvases home so I could spice it up a little. I have craft drawers and lots and lots of supplies. I wasn't sure what I wanted to do to them, but I knew I didn't want the canvases to be exact copies of one another.
I placed the letters on the canvases to spell out both of their first names. It looked like it would eventually fall off over time, so I used some Mod Podge - matte-mat-mate, to paint over (on top of) the letters so they would be glued to the canvas. It dries clear so I just put enough on top of the letters so that they would be secure.

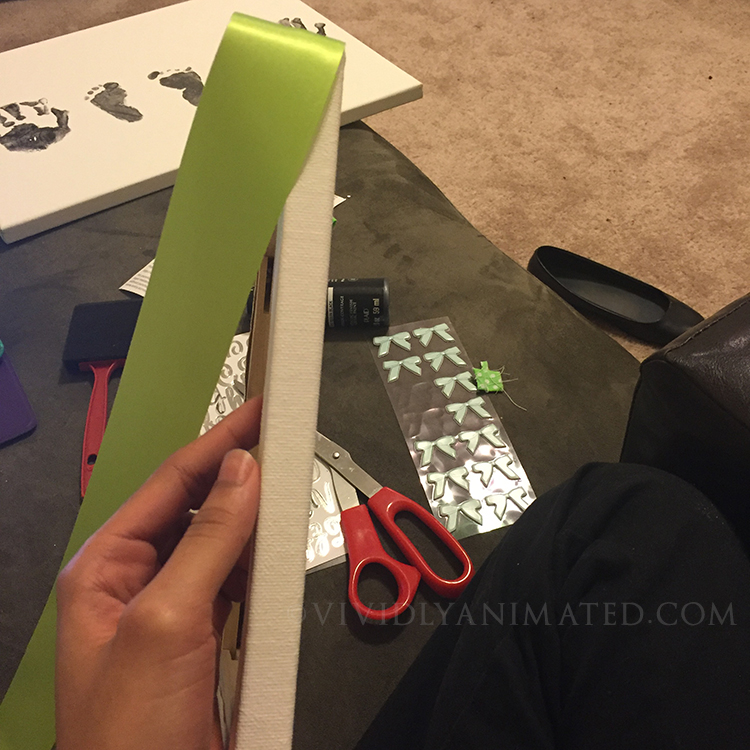


I started with deciding I wanted bows to put on both of them. I used this tutorial to create a small bow (I only made the bow part 5x7 inches because I wanted a tiny bow & I used the hot glue to secure it instead of sewing it closed, since it was being glued to a canvas I didn't add anything else to the back of it either). I glued the bow onto the canvas using the hot glue gun. I then pulled ribbon from my craft drawer, it was 1.5 inch ribbon and wanted to put it on the outer part of the canvas the same (close enough) color as the bow. I started on one side and used the glue gun to secure the starting point. I then stretched it to the other side, once I got it the way I wanted I put hot glue on the otter edge all the way down and then pressed the ribbon following the edge all the way down. I then repeated until I got to the last side to complete the loop. I cut the ribbon so that the ends would meet up about half an inch overlap, I put hot glue on the canvas and completed the last side, only leaving me with the loop to close. I put glue on the end of the ribbon and pressed it down and closed the loop and began working on the back. I started at 1 corner, folding one corner down and then pressing the other on top of it and securing it with hot glue. I then followed the ribbon down one edge gluing it down as I went along until I got to the next corner, then folded one side of the corner down and put glue on top, then folded and pressed the corner down on top of it to create a "perfect corners" look. I repeated until all flaps and all corners were glued down.


Then I took the other canvas created a new blue bow, glued it down and for the other one I wanted the corner to round off like a present wrapping almost. I played with the ribbon an situated it where I wanted to place it, that determined how much I cut. I started on one side, putting glue on the back of the canvas, close enough to the point where the stretched canvas ends, stretched the ribbon tight enough so there's no gaps, then wrapped it back around the back, and put glue there too. I only put glue on the back of the canvas for this part of the ribbon, it is not glued on the front side, but I pulled it tight enough and glued the back so that it shouldn't have a problem with coming off or becoming droopy. I then cut the ribbon so that it matched up close enough with the white canvas on the back.
That's it :) it probably took me about and hour to complete.